For Kopi, to our great surprise, we found out that we needed to add tutorial. How can someone not know how to make toasted marshmallow latte (in our game world) was beyond our understanding: it is all super straightforward, we implemented the whole process and it was a clear as day. Oh, wait!
We started with picture-based tutorials that appeared before the level started, and required the players to acknowledge them. Those tutorials did not work at all–most test players skipped them completely, and those who took the second or two to look still did not remember the steps.

Grind coffee beans, get the ground coffee, put it in the espresso machine, wait for it to finish, serve. Easy, right? All that the players have to do was to look carefully, understand our infographics, press (A) to confirm and then go to make delicious espressos. What the players saw (we suspect) was something completely different.
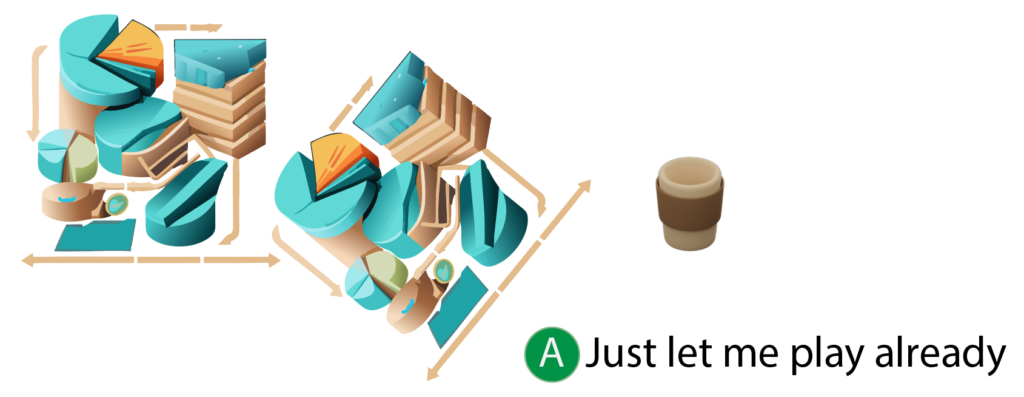
What now? We could make the tutorial clearer: maybe divide it into multiple pictures, maybe add more text to clearly explain what needs to be done. But those solutions didn’t feel right, and our own gameplay experience told us how frustrating making players follow through a tutorial is. (Here, we take the grumpy old gamers’ approach: we work all day, and in the evening we want to play a little to relax. If a game makes us go through a long tutorial before we can jump in and play together, it will not make for happy players.)
What we wanted was a non-intrusive in-game tutorial, which that could:
- deliver different levels of hand-holding to the players,
- be stable in face of unpredictable player behaviour,
- be as painless as possible to author and maintain,
- be as isolated as possible from the already existing game code.
Tutorial architecture
Our core concept was that the tutorial function is a transformation from some state to the most appropriate tutorial step. The state represents the state of all tutorial-enabled actors in the scene and already seen steps; the tutorial step is simply the message to be displayed and an indication whether is represents the end of the tutorial. When reduced to such an abstract concept, there’s little to object. But how to build up this state? We already had an ecosystem of other AActors that–while they all had something to do with kitchens–they also each did different things; all ultimately in Blueprints, but some were subclasses of our own C++ classes, some were directly AActor subclasses. We did not want to tie them all down into some common supertype, never mind that the ACharacters also need to take part in the tutorial.
Instead, we split the tutorial into separate AActorComponents: components that contribute to the state and one component that represents the tutorial itself. As long as the state-contributing components can find the tutorial component itself, they can each publish the state information of the AActor they are attached to; and the tutorial component can update the state. Additionally, the tutorial component replicate the state to all clients, allowing all players to follow take part in the same tutorial. So we have
UCLASS(Abstract, ClassGroup=(Kopi), meta=(BlueprintSpawnableComponent))
class KOPI_API UKopiTutorialComponent : public UActorComponent {
	GENERATED_BODY()
};

UCLASS(ClassGroup=(Kopi), meta=(BlueprintSpawnableComponent))
class KOPI_API UKopiTutorialContainerComponent : public UKopiTutorialComponent {
	GENERATED_BODY()

protected:
	UFUNCTION(BlueprintCallable, Category="Kopi|Tutorial")
	void Notify(const TArray<FKopiIngredient> InIngredients, bool bAvailable);
};

UCLASS(ClassGroup=(Kopi), meta=(BlueprintSpawnableComponent))
class KOPI_API UKopiTutorialBaristaComponent : public UKopiTutorialComponent {
	GENERATED_BODY()
protected:
	UFUNCTION(BlueprintCallable, Category="Kopi|Tutorial")
	void Notify();
};

UCLASS(ClassGroup=(Kopi), meta=(BlueprintSpawnableComponent))
class KOPI_API UKopiTutorialProcessorComponent : public UKopiTutorialComponent {
	GENERATED_BODY()

protected:
	UFUNCTION(BlueprintCallable, Category="Kopi|Tutorial")
	void Notify(const EKopiProgressState State, const TArray<FKopiIngredient> Ingredients);
};
These components are added to our processors (think espresso machine, coffee grinder, …); containers (cups, plates, …), as well as the characters. The users of these components are responsible for calling the Notify functions as their state changes.
On the other end of the Notify calls is the UKopiTutorialRuntimeComponent, which is responsible for updating the state appropriately and computing the next best tutorial step.
USTRUCT()
struct FKopiTutorialProcessorState {
	GENERATED_BODY()

	UPROPERTY()
	const AActor *Actor;
	EKopiProgressState State;
	TArray<FKopiIngredient> Ingredients;
};

USTRUCT()
struct FKopiTutorialContainerState {
	GENERATED_BODY()

	UPROPERTY()
	const AActor *Actor;
	TArray<FKopiIngredient> Ingredients;
	bool bAvailable;
};

USTRUCT()
struct FKopiTutorialBaristaState {
	GENERATED_BODY()

  AKopiCharacter* Barista;
	TSoftObjectPtr<AKopiContainer> Container;
};

UCLASS()
class KOPI_API UKopiTutorialRuntimeComponent : public UActorComponent {
	GENERATED_BODY()
	TArray<FKopiTutorialProcessorState> ProcessorStates;
	TArray<FKopiTutorialContainerState> ContainerStates;
	TArray<FKopiTutorialBaristaState>   BaristaStates;
public:

	void NotifyProcessorStateChange(const AActor *Processor,
	                                const EKopiProgressState State,
	                               const TArray<FKopiIngredient> &Ingredients);

	void NotifyInteraction(const AKopiCharacter *Barista);

	void NotifyContainer(const AActor *Container,
	                     const TArray<FKopiIngredient> &Ingredients,
	                     bool bAvailable);
};
So we now have a structure where we can add the appropriate UKopiTutorial...Component to our various actors, and as long as we wire in its Notify calls, it can update the UKopiTutorialRuntimeComponent, which will in turn update its state and compute the next tutorial step. We have not added any complex class hierarchy.
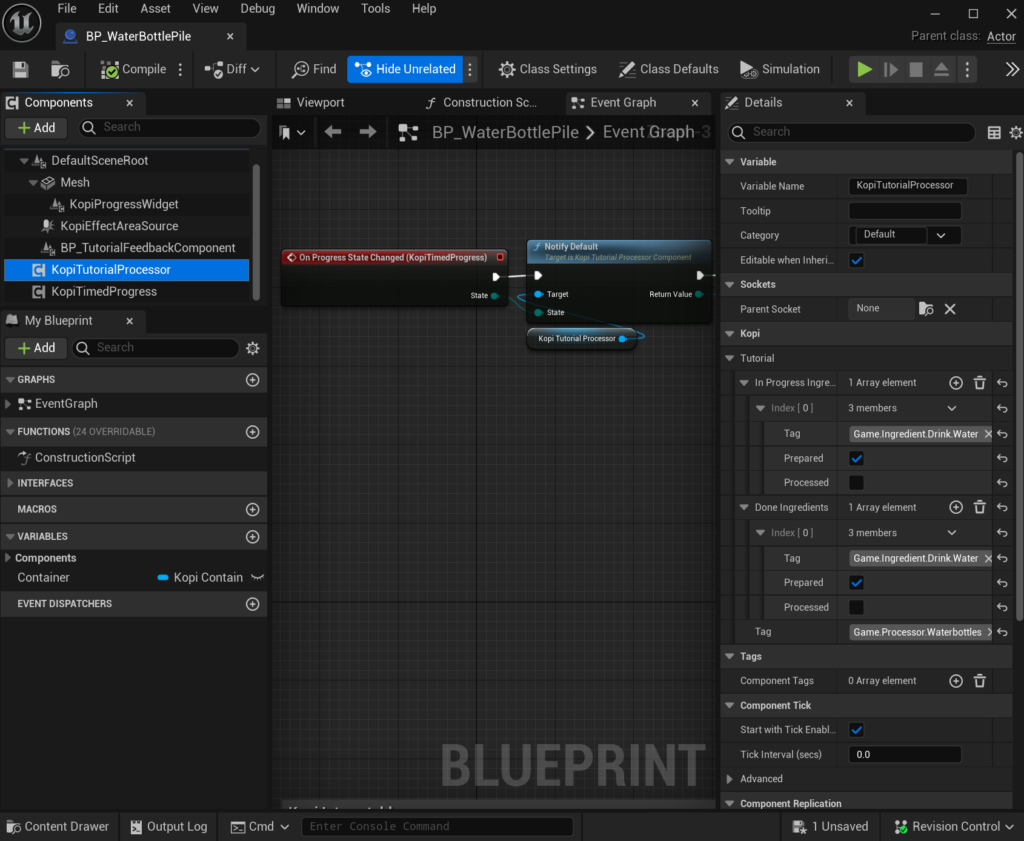
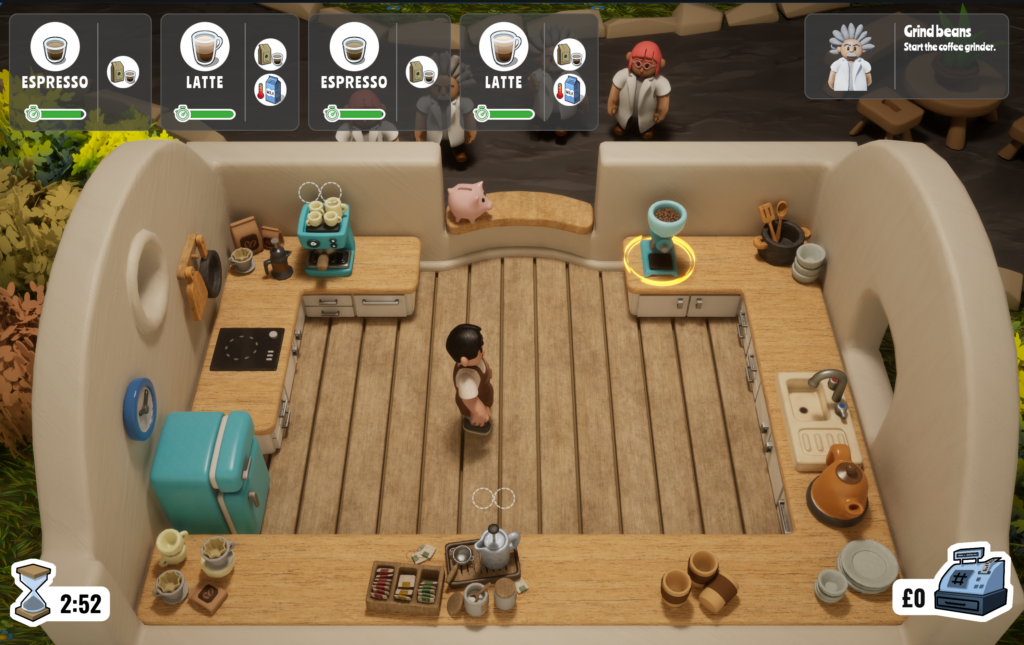
Here, the BP_WaterBottlePile actor can become participant in the tutorial structure simply by including the UKopiTutorialProcessorComponent and calling its Notify (or–for developer convenience–NotifyDefault, which uses the pre-configured list of ingredients.) The Notify call ends up calling the UKopiTutorialRuntimeComponent::NotifyProcessorStateChange, whose job is to update the tutorial state and compute the step to be displayed to the user.
Tutorial Runtime Component
The UKopiTutorialRuntimeComponent, after updating the state of all tutorial-enabled components, needs to compute the next best step to display to the user. Before jumping into how exactly it should do that, let’s take a step back and consider what a tutorial in our world actually is. Suppose we are making espresso. The happy path is
- Use the coffee grinder (a processor) to grind beans,
- Put the ground beans (in a default container) in the espresso machine (a processor),
- Pour the freshly brewed espresso into a cup (a container),
- Serve ∎
This should be enough for humans operating in the real world, but this simple happy path tutorial includes a lot of implicit assumptions. For example, we assume in the first step the coffee grinder is idle; that we will need to come up to it and interact with it; it will then need some time to complete its job; only when it is completed, we can interact with it again to pick up the beans. The barista will then carry the ground beans to the espresso machine; we assume that the barista will not drop the beans on the way to the espresso machine; we assume that the barista will not go off on a tangent and pour some water into a cup; and so on and so forth.
A little more precise tutorial might therefore be
- if the coffee grinder is idle and the espresso machine is idle,
if the barista is not carrying anything,
if there are no [default containers with] ground beans lying around,
if there is no cup with espresso already poured in,
then
highlight the coffee grinder and display “Start the coffee grinder” - if the coffee grinder is
idlein progress, but not done yet and the espresso machine is idle,
if the barista is not carrying anything,
if there are no [default containers with] ground beans lying around,
if there is no cup with espresso already poured in,
then
highlight the coffee grinder and display “Wait for the grinder to finish” - if the coffee grinder is
in progress, but not done yetdone and the espresso machine is idle,
if the barista is not carrying anything,
if there are no [default containers with] ground beans lying around,
if there is no cup with espresso already poured in,
then
highlight the coffee grinder and display “Pick up the beans” - …
The tutorial should really handle some edge conditions, for example
- if the espresso machine has been started but contains anything except for coffee beans,
if the barista is not carrying anything,
if there is no cup with espresso already poured in,
then
fail the tutorial and display “Espresso is only ground coffee” - if the barista is not carrying anything,
if there is a cup with espresso already poured in,
then
highlight the cup and display “Serve the espresso” - …
As you can see, things get very complicated very quickly, but some structure begins to appear. A tutorial consists of many steps, and each step has conditions and actions. The conditions evaluate the state of the whole kitchen, and the actions decide what the user will see. Turning the above tutorial step definitions to something closer to code, we could imagine the following pseudo-code.
Espresso

step start {
    barista: empty
    processors: all [
        CoffeeGrinder, ==not-started
        EspressoMachine, ==not-started
    ]
    containers: none [
        *, [Bean:F,F]
    ]
    highlight: processor CoffeeGrinder
    message: "Grind beans"
    hint: "Start the coffee grinder."
}

step start-grinder {
    barista: empty
    processors: all [
        CoffeeGrinder, ==in-progress
        EspressoMachine, ==not-started
    ]
    containers: none [
        *, [Bean:F,F]
    ]
    message: "Grind beans..."
    hint: "The grinder needs a little time."
}

...

step fail-not-espresso {
    barista: empty
    processor: EspressoMachine, >not-started, not exactly [Bean]
    highlight: processor EspressoMachine
    fail
    message: "This is not an espresso"
    hint: "Espresso is just brewed beans"
}
Evaluation
This all looks very much like… oh my goodness, no! Is it possible that we are re-inventing expert system according to The Computer Chronicles – Artificial Intelligence (1984) episode? It certainly looks like a kind of expert system, something that we did decades ago at university. CLIPS anyone!? Well, the good news is that we certainly don’t need to have a fully-blown [forward chaining] rule engine, but we can take some inspiration from such systems.
The steps are the rules, each with conditions and actions. This is fairly straight-forward: iterate over all elements of TArray<FKopiTutorialStep> and check if each FKopiTutorialStep‘s conditions are satisfied. The problem arises when multiple step’s conditions are satisfied. Which step do we pick? Naïvely, we can start with a rule that we prefer later steps over earlier steps; in other words, we don’t stop at the first step whose conditions evaluate to true, but scan through all steps and pick the latest one. However, this quickly becomes very fragile; and for complicated recipes, it turned out to be impossible to precisely define the one order to rule them all. Consider toasted marshmallow latte: make espresso with hot milk and then add toasted marshmallows; even though the ideal process is to start the coffee grinder first and while the coffee grinder is working toast the marshmallow, it is perfectly OK to first toast the marshmallow and then start the coffee grinder; while making the latte, in our game world the player can start with milk and then add beans as well as start with beans and then add milk. You can see how the rule space explodes. What did those old-school expert systems do? Aha!–as a result of executing a rule, it was also possible for the rule to add new facts! We do the same; for each iteration over the rules, for each rule whose conditions are satisfied, we allow it to add items to either the current evaluation state or to the global state.
USTRUCT()
struct FKopiTutorialEvaluationState {
	GENERATED_BODY()

	FName Step;
	FName Data;
};
This allows us to ensure that we can detect situations where the player does something unexpected.
step brewed-no-cup {
    barista: empty
    processor: EspressoMachine, >=just-done, [Bean]
    containers: none [
        *, [Bean:F,F]
    ]
    highlight: processor EspressoMachine
    state: none [brewed-pour]
    message: "You still need cup"
    hint: "The coffee is done, pour it into the cup."
}

step brewed-pour {
    barista: Cup, []
    processor: EspressoMachine, >=just-done, [Bean]
    containers: none [
        *, [Bean:F,F]
    ]
    highlight: processor EspressoMachine
    add-global
    message: "Pour the coffee"
    hint: "The coffee is done, pour it into the cup."
}

step serve {
    barista: Cup, [Bean:T,T]
    highlight: customer
    add-global
    message: "Serve"
    hint: "All done; serve up!"
}
This approach allows us to write stable [and dare I say common-sense] rules that can show the most relevant step, but do not get stuck in a loop particularly when the player just does not follow the tutorial. And yes, we have seen it–“Start by grinding the beans,” the good Einstein lookalike says. What does the player do? Pick up the kettle and pour water into it, and then put it on the stove. Then pour the hot water into the cup and proceed to pour the hot water into the recycling bin. But that’s the essence of gameplay–people do stuff, play!–if they wanted to think about precise and logical, they’d be programming instead.
Decoupling and testing
As software engineers, we should not add all that code to the UKopiTutorialRuntimeComponent; it would make sense to have a separate code structure, maybe one where we model every step in its own structure; and then add the Evaluate method to that. To allow the Evaluate method to access the state, it needs to accept an interface that provides the state access. We’re now back on the solid ground, this is plain old software design. In the broad strokes, it should provide access to all the states
class IKopiTutorialRuntime {
public:
	virtual ~IKopiTutorialRuntime() = default;

	virtual TArray<FKopiTutorialEvaluationState> GetEvaluationStates() const = 0;
	virtual TArray<FKopiTutorialBaristaState>    GetAllBaristaStates() const = 0;
	virtual TArray<FKopiTutorialContainerState>  GetNonBaristaContainerStates() const = 0;
	virtual TArray<FKopiTutorialProcessorState>  GetProcessorStates() const = 0;
};

class IKopiTutorialEvaluation {
public:
	virtual ~IKopiTutorialEvaluation() = default;

	void AddStep(const FKopiTutorialStep& Step, FName Data, bool Global) = 0;
}
We make the UKopiTutorialRuntimeComponent publicly inherit the two interfaces, and we’re in the last stretch. Additionally, because we have interfaces, we can write all the required unit tests to make sure our baby rule engine works as expected.
Visual feedback
We need to ensure that the player is aware of what to do next; highlight the relevant actor and display any relevant messages. The messages are easy–we can use the standard Unreal Engine UUserWidgets to implement that. The slightly more interesting is highlighting a specific actor that the player should focus their attention to. The motivation and design was the same as the motivation and design behind the UKopiTutorialComponent: we didn’t want to tie ourselves into any object hierarchy. But the keyword here is visual; and we didn’t even want to assume what form that feedback will take. All that we wanted in our C++ code was something that can display feedback, no matter how it’s implemented. An interface.
UINTERFACE()
class UKopiTutorialFeedback : public UInterface {
	GENERATED_BODY()
public:
	static void OnTutorialHighlight(AActor* WorldContext, bool bHighlight, bool bFallback);
};

class KOPI_API IKopiTutorialFeedback {
	GENERATED_BODY()
public:
	UFUNCTION(BlueprintImplementableEvent, Category="Kopi|Tutorial")
	void OnTutorialHighlight(bool bHighlight, bool bFallback);
};
The convenience method UKopiTutorialFeedback::OnTutorialHighlight is used to direct the feedback to the actor to be highlighted itself, or to any of the actor’s components that implement the IKopiTutorialFeedback interface.
void UKopiTutorialFeedback::OnTutorialHighlight(AActor *WorldContext, bool bHighlight, bool bFallback) {
	if (WorldContext == nullptr) [[unlikely]]
			return;

	if (WorldContext->Implements<UKopiTutorialFeedback>()) {
		IKopiTutorialFeedback::Execute_OnTutorialHighlight(WorldContext, bHighlight, bFallback);
	} else
		for (const auto Component : WorldContext->GetComponentsByInterface(StaticClass())) {
			IKopiTutorialFeedback::Execute_OnTutorialHighlight(Component, bHighlight, bFallback);
		}
}
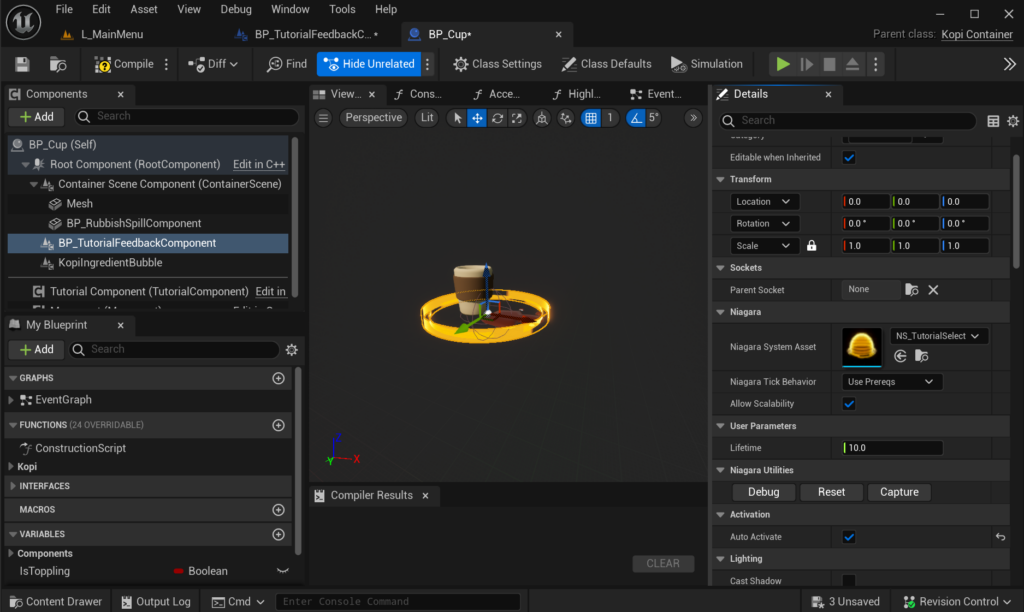
The feedback method that we use almost exclusively is implemented in a blueprint component
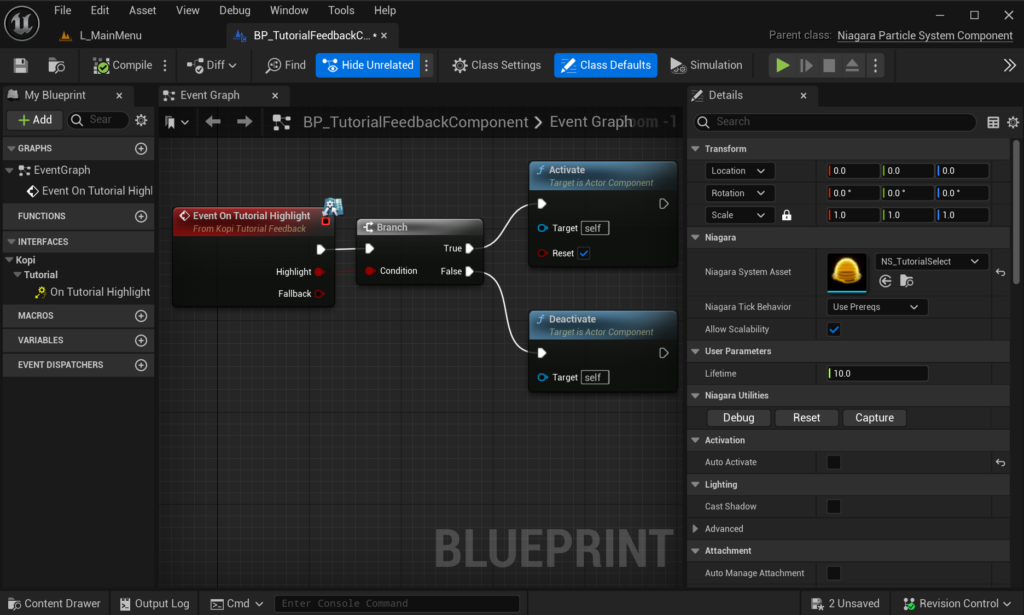
On highlight it activates a Niagara system which serves as our highlight. Whichever actor needs it can simply add this component, make sure it is aligned as required, and all is done.
Summary
And here we are–gone are the image-based tutorials that no-one read; and in are in-game tutorials that can guide the player along the way in a dare we say common-sense kind of way and with noticeable yet unobtrusive VFX.